LaTeX: Creating placeholder boxes for mathematical operations
Did you ever need empty placeholder boxes in your LaTeX document. I did, and here is a nice way to solve the problem
1 First Attempt
Let’s first start with some basic definitions
\documentclass{article}

% A4 layout
\usepackage[a4paper,margin=2.5cm]{geometry}

% Greek + English (UTF-8) with pdfLaTeX
\usepackage[utf8]{inputenc}
\usepackage[english,greek]{babel} % switch with \selectlanguage{greek} / {english}

% Arrays and spacing
\usepackage{array}
\renewcommand{\arraystretch}{1.6} % line spacing between rows
The only command that needs explaining is \renewcommand{\arraystretch}{1.6}, which increases row height globally; you can add per-row extra space with \[4pt] too.
The other commands just enable greek and english characters (or you can use XeLaTeX and polyglossia)
2 Adding xparse package
\usepackage{xparse}The xparse package gives LaTeX a more powerful way to define commands and environments compared to the old \newcommand
- It allows optional arguments with defaults, multiple types of arguments, key–value style arguments, etc.
- Without it, \newcommand is more limited (only mandatory args and one optional with a fixed default).
Perfect 👌 Let’s break it all down step by step.
2.1 1. \usepackage{xparse}
The xparse package gives LaTeX a more powerful way to define commands and environments compared to the old \newcommand.
- It allows optional arguments with defaults, multiple types of arguments, key–value style arguments, etc.
- Without it,
\newcommandis more limited (only mandatory args and one optional with a fixed default).
2.2 2. \NewDocumentCommand vs \newcommand
\newcommand{\foo}[2][default]{...}→ only supports:- up to 9 arguments
- at most one optional argument (and it must be the first one)
\NewDocumentCommand{\foo}{argument-spec}{...}→ supports:- unlimited arguments
- optional arguments anywhere in the argument list
- multiple defaults, star forms, key–value, etc.
- much clearer specification syntax
So we use \NewDocumentCommand because it’s more expressive.
3 Creating the first iteration of digitbox
% \digitbox[<width>][<height>]  (defaults: 8mm x 10mm)
\NewDocumentCommand{\digitbox}{O{8mm} O{10mm}}{%
  \begingroup
  \setlength{\fboxsep}{0pt}% no inner padding
  \fbox{\makebox[#1]{\rule{0pt}{#2}}}%
  \endgroup
}
3.1 1. The O{8mm} O{10mm} in \NewDocumentCommand{\digitbox}{O{8mm} O{10mm}}
In the argument specification,
O{<default>}means optional argument with default value<default>.
So here:
- First optional argument: width (default
8mm) - Second optional argument: height (default
10mm)
- First optional argument: width (default
That’s why you can call \digitbox:
\digitbox→ box of8mm × 10mm\digitbox[12mm]→ width12mm, height still10mm\digitbox[12mm][15mm]→ width12mm, height15mm
3.2 2. \fboxsep
- LaTeX adds padding inside framed boxes by default.
\fboxsepis the length of that padding. Default is around 3pt.- Setting
\setlength{\fboxsep}{0pt}removes the extra whitespace, so the frame hugs your content exactly. - Without this, the box would look oversized compared to digits.
3.3 3. Make the actual box: \fbox{\makebox[#1]{\rule{0pt}{#2}}}
Let’s dissect:
\fbox{...}→ draws a rectangular frame around its contents.\makebox[#1]{...}→ makes a box of width#1.- If contents are smaller, it pads (here empty).
\rule{0pt}{#2}→ makes an invisible vertical rule with:- width
0pt(so not visible horizontally) - height
#2(so the box gets that much tall).
- width
Together:
- Width =
#1(first argument, e.g.8mm) - Height =
#2(second argument, e.g.10mm) - Content is invisible, so you just see an empty framed box.
- Width =
That’s how we force \fbox to have fixed dimensions instead of shrinking to its contents.
3.4 4. Removing the % from the commands alters the result. Why?
You will ask, isn’t % just for comments? Well yes, % is indeed the comment character in LaTeX. But in TeX, it has one extra important side effect: it also removes the newline (or space) that follows it.
3.4.0.1 What’s going on here?
Let’s look at our code:
\NewDocumentCommand{\digitbox}{O{8mm} O{10mm}}{%
  \begingroup
  \setlength{\fboxsep}{0pt}% no inner padding
  \fbox{\makebox[#1]{\rule{0pt}{#2}}}%
  \endgroup
}
The
%at the end of each line tells LaTeX:- “Ignore the rest of this line” (the comment part).
- “Also suppress the newline that would otherwise count as a space.”
So the command body is really glued together without any unwanted spaces between tokens.
3.4.0.2 Why does it matter?
If you remove the %, then the end-of-line after each line break is treated like a space character.
For example:
\fbox{\makebox[#1]{\rule{0pt}{#2}}}
\endgroup
Here, after the } you have an implicit space (because of the line break). LaTeX sees it as if you had typed:
\fbox{\makebox[#1]{\rule{0pt}{#2}}} ␣ \endgroupThat extra space can:
- Sneak into your boxes as an actual space of width ~0.3em.
- Shift alignment slightly.
- Make the page look different, depending on where the macro is used.
3.4.0.3 Rule of thumb
- If you’re writing macros and don’t want spurious spaces creeping in, end lines with
%. - If spaces/newlines are significant, don’t use
%.
4 We want our digit boxes to have contents.
4.1 1. Changing our code.
Let’s change our command to
% With content:
\NewDocumentCommand{\digitbox}{O{8mm} O{10mm} m}{%
  \begingroup
  \setlength{\fboxsep}{0pt}%
  \fbox{\makebox[#1][c]{\rule{0pt}{#2}\smash{#3}}}%
  \endgroup
}
% Blank box:
\NewDocumentCommand{\emptybox}{O{8mm} O{10mm}}{\digitbox[#1][#2]{}}
We create an emptybox command, to be able to have easy access to empty squares.
4.2 2. What does that \smash does?
\smash{stuff} tells TeX:
“Ignore the height and depth of stuff when calculating vertical spacing. Treat it as if it has zero height and depth.”
- Horizontal width is kept.
- Vertical dimensions are suppressed.
4.3 3. Why it matters here?
If you just put #3 inside, the box’s vertical size would be influenced by how tall that character or number is (e.g. an uppercase A vs. lowercase g vs. digit 5). That means the boxes could end up with slightly different heights depending on their content.
By using \smash{#3}:
- The height/depth of
#3is ignored. - The rule (
\rule{0pt}{#2}) alone controls the vertical dimension. - Thus, all boxes stay the same height, and the content is vertically centered inside them.
Notes:
\raisebox{0pt}[0pt][0pt]{#3}is equivalent to\smash{$3}- Instead of
\rule{0pt}{#2}, we can use a “phantom character” that fixes height:\fbox{\makebox[#1][c]{\vphantom{\rule{0pt}{#2}}#3}}
5 Our digits are too small and not vertically aligned.
What we see is that our digits are too small compared to the box. We would like them to grow with the box. Let’s fix it.
5.1 1. Changing the command
\NewDocumentCommand{\digitbox}{O{10mm} O{12mm} m}{%
  \begingroup
  \setlength{\fboxsep}{0pt}%
  \fbox{\parbox[c][#2][c]{#1}{\centering \strut #3}}%
  \endgroup
}
\NewDocumentCommand{\emptybox}{O{10mm} O{12mm}}{\digitbox[#1][#2]{}}
5.2 2. What is the parbox and what is the difference with fbox?
5.2.1 \parbox
A
\parboxis a text box that can contain paragraph material (multiple lines, text, math, etc.).You can specify:
- width → mandatory argument (e.g.,
5cm) - height → optional argument (e.g.,
[2cm]) - vertical alignment inside the box (top, center, bottom).
- width → mandatory argument (e.g.,
The contents are typeset as if it were a mini page of that width.
Example:
\parbox[c][12mm][c]{20mm}{Hello \\ World}→ box 20mm wide, 12mm tall, content centered vertically, with two lines of text.
Think: “a mini container that controls line breaking and vertical alignment”.
5.2.2 \fbox
\fboxjust draws a frame around whatever box you give it.It does not set width, height, or alignment by itself — it wraps its contents.
By default, it adds inner padding (
\fboxsep) and uses line thickness (\fboxrule).Example:
\fbox{Hello}→ draws a rectangle just large enough to fit “Hello” plus padding.
Think: “a picture frame for an existing box”.
5.2.3 The difference
\parbox= content box (controls size + vertical alignment).\fbox= frame wrapper (draws a border around its contents).
They are often used together:
\fbox{ \parbox[c][12mm][c]{20mm}{Hello} }→ a framed box, fixed width = 20mm, fixed height = 12mm, with “Hello” centered inside.
That’s exactly what we did for your \digitbox:
\parboxensures the box has fixed width/height and centers the content.\fboxthen draws the border around it.
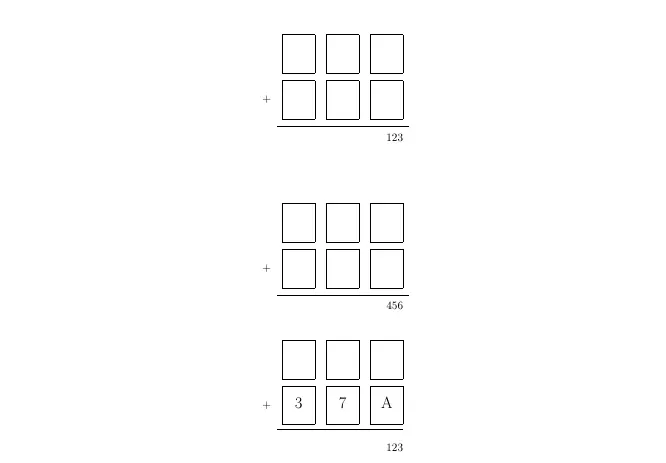
6 Time to use them
\[
\begin{array}{@{} r r r r @{}}
  \phantom{+} & \emptybox & \emptybox & \emptybox \\
  % --- Explicit extra space between rows (very reliable) ---
  \noalign{\vskip 6pt}
  +           & \digitbox{\Large 3} & \digitbox{\Large 7} & \digitbox{\Large A} \\
  % Space above/below the rule so it doesn't touch the boxes
  \noalign{\vskip 4pt}
  \cline{2-4}
  \noalign{\vskip 6pt}
              &                     &                     & \makebox[10mm][r]{123}
\end{array}
\]
6.1 Start math mode
We start with \[ \] which is equivalent to \begin{displaymath}
6.2 Start defining an array layout
then we do
\begin{array}{@{} r r r r @{}}This tells LaTeX how to typeset the columns of the array (or tabular).
6.2.1 The pieces
r- Means right-aligned column.
- So here we have 4 right-aligned columns:
r r r r
@{...}Inserts custom material instead of the default inter-column spacing.
By default, LaTeX puts some horizontal padding (
\tabcolsep) at the left, between, and at the right of columns.@{}with empty braces means: remove that padding entirely.So:
- The leading
@{}removes the left padding at the very start of the array. - The trailing
@{}removes the right padding at the very end.
- The leading
So @{} r r r r @{} means
“Make 4 right-aligned columns, and strip off the default horizontal padding on the far left and far right.”
6.2.2 Why we use it here
- Without
@{}, you’d get extra whitespace around the array (so the boxes wouldn’t line up snugly with the plus sign or with the rule). - With
@{}, you have tight control: the array content starts exactly at the left edge of the first column and ends exactly at the right edge of the last column.
6.2.3 Visual summary
| Column specifier | Effect |
|---|---|
{r r r r} | 4 right-aligned columns with normal LaTeX spacing at the edges |
{@{} r r r r @{}} | 4 right-aligned columns with no extra space at left or right |
{l c r} | left, center, right aligned columns |
{r@{+}r} | 2 right-aligned columns with a literal + printed between them |
6.3 The first line
\phantom{+} & \emptybox & \emptybox & \emptybox \\We add an invisible + in the first column and 3 empty boxes in the next 3 columns and change line
6.4 Skip line
\noalign{\vskip 6pt}This forces vertical space between specific rows (and around \cline), this is the “nuclear option” that always works inside array/tabular.
The rest do not require any explanation.